My Test NAS
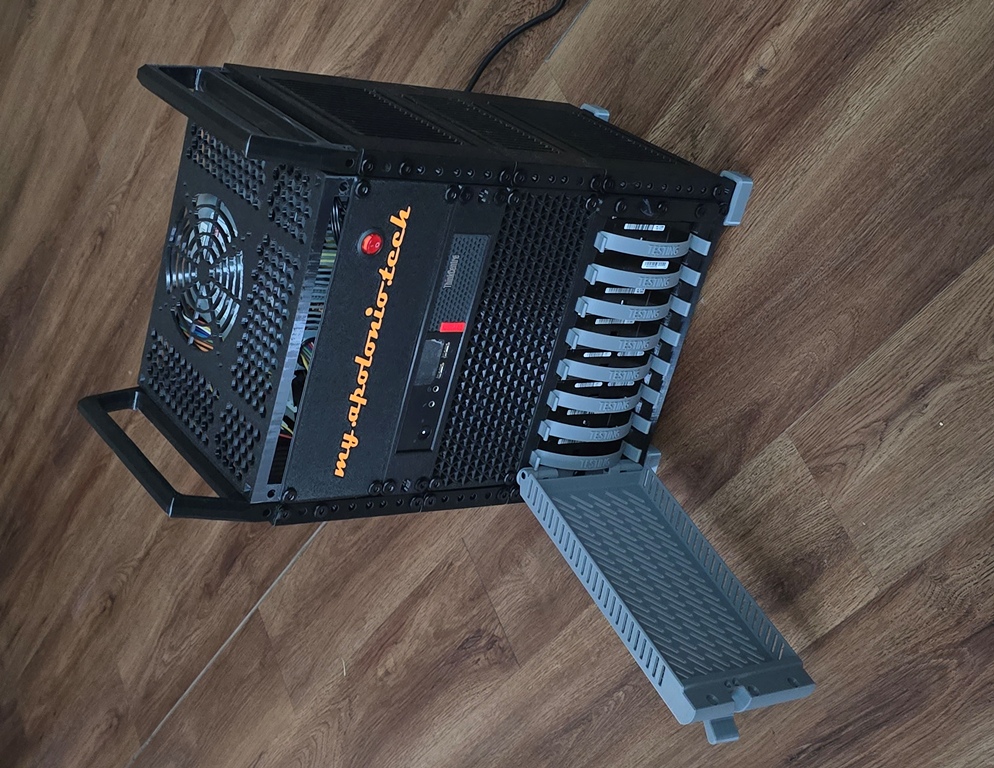
Head Unit
This is my test NAS, I use to learn and try out new things. As pictured above it is with a 8 SATA drives and an M910Q with an NVME 6 SATA port connection
It worked but only for 6 drives the remaining two drives were connected via USB to SATA connection.
Currently I am using an M920Q with an LSI SAS9300 I got off ebay for 21.95 flashed into IT mode.
This is the “head” unit here are the specs as of this posting
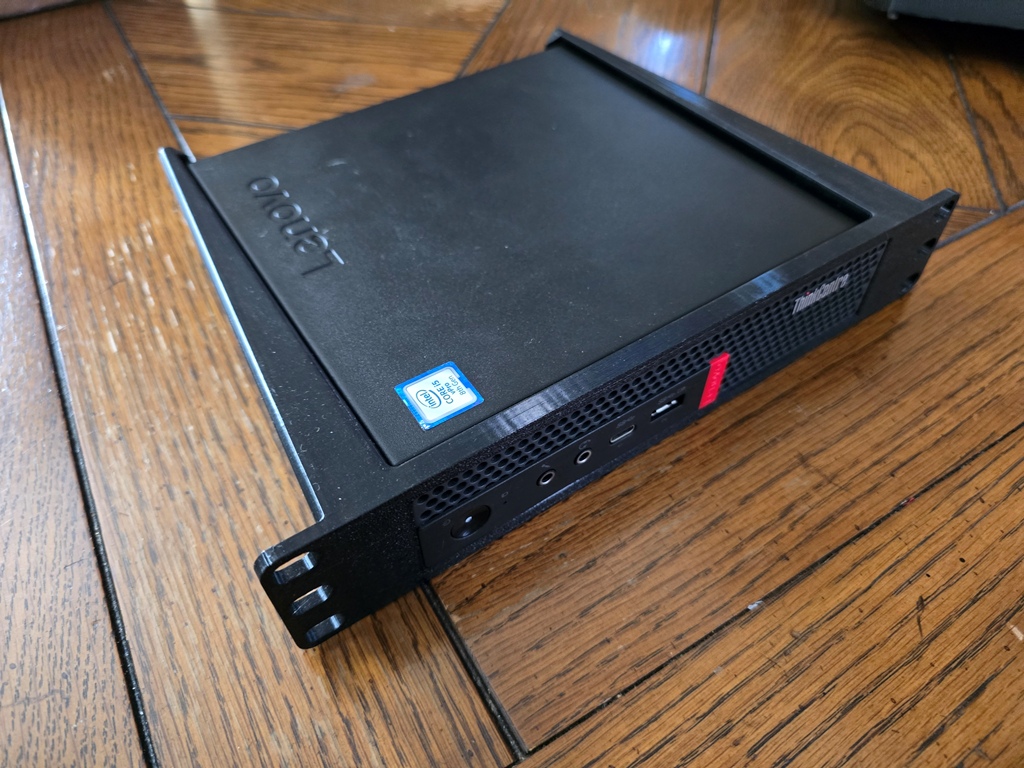
- Lenovo M920Q ThinkCentre Mini PC
- CPU Intel i5-8500T 2.10Ghz
- 8GB for RAM (two 4GB SODIMM modules)
- Boot Drive is an SKHynix 256GB NVME Drive
- OS os Rocky 9.7 with ZFS modules
I purchased it on ebay for 159.00. Side note, I also purchased an M910Q with 16GB of ram for less and will swap RAM between the units later.
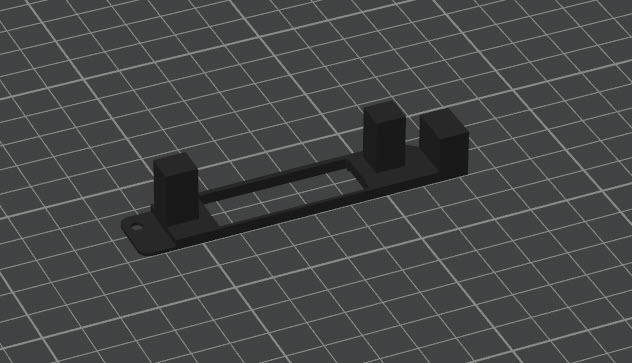
The M920Q didn’t come with a riser so I went to amazon and purchased one 14.99
Also I needed to print my own 3D bracket
Here is how the HBA looks like installed in the M920Q
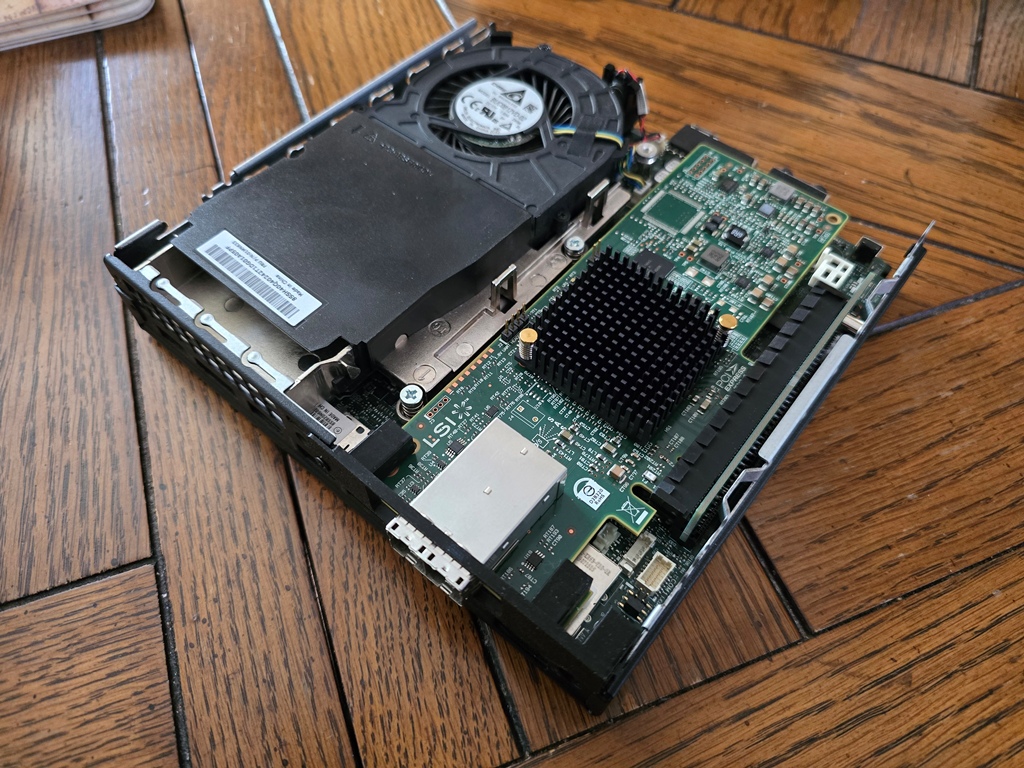
Note you have to remove the front bracket to allow this to fit.
I used PETG because heat was a concern, the HBA been on for couple hours now and it is hanging in there at 102C, glass transition for PETG is 75 to 85C so it is still a concern.
The cables, SFF-8644 to 4 X SATA are 19.08 on ebay, I did order some from Newegg (they 20.46 they were shorter 0.5M) but you need two of them. So the cables altogether are more expensive than the HBA itself. An important consideration is length, get the 1M ones if you are going to have SATA disks. Furthermore in this use case 1M is long enough. If you are going SAS you can go longer, but SATA spec is 1M.
Rack System
All of this is enclosed in a 10″ 8U Rack I printed myself
https://www.printables.com/model/1090551-modular-10-inch-server-rack-reworked
My printer isn’t big enough to print an 8U rail but I did glue two 4U together and added some side panels to improve strength.
The head unit used this bracket to mount into the 10″ rack
https://makerworld.com/en/models/1945283-lenovo-thinkcentre-tiny-10-rack-mount-m720q
I have an older version no keystone
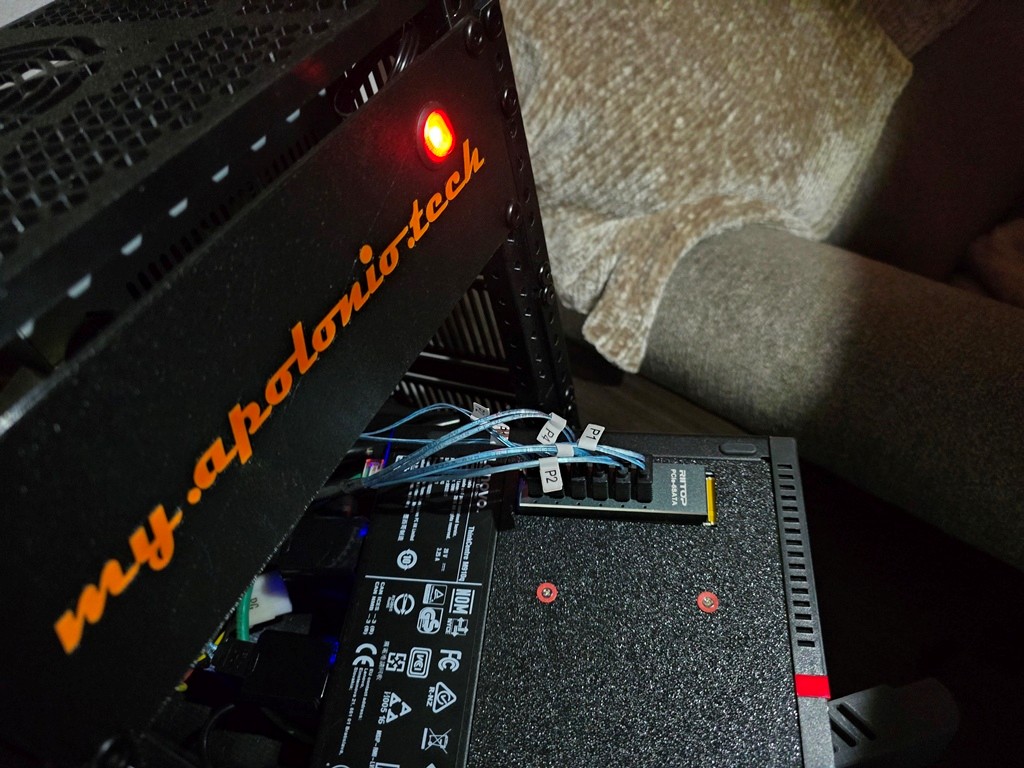
Here is the back of the rack
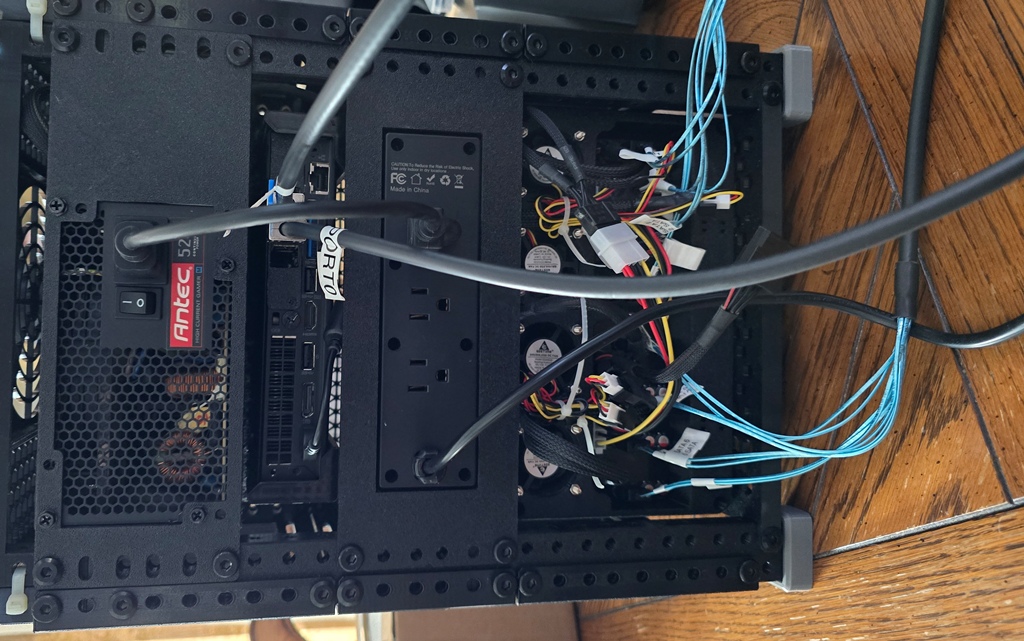
The power supply is a standard ATX power supply. In my lab I just pulled out one from an old decommissioned PC I had lying around. I will not deny that the power supply is a significant cost. I purchased one on amazon for another JBOD and it was an MSI MAG A750BE for 69.99
The rack mount I used for that is this one
https://www.printables.com/model/1428564-atx-power-supply-mount-for-10-racks
Right below that is the Lenovo M920Q
Below that is the Power Distribution Unit
- https://www.amazon.com/dp/B0F2HJRNK1 Power Strip
- https://www.printables.com/model/1392382-10-2u-rack-mount-for-cheap-tiny-pdu-w-usb
The PDU is just a fancy term for a power strip. It connects to the mains (preferably to a UPS). But it reduces cables that need to go outside. Note the 1ft power cable going to the ATX power supple, on the other side (I don’t have a pic) is the power supply for the Lenovo. In addition, there are USB plugs and I am thinking of adding these fans because the current 40mm are pretty loud
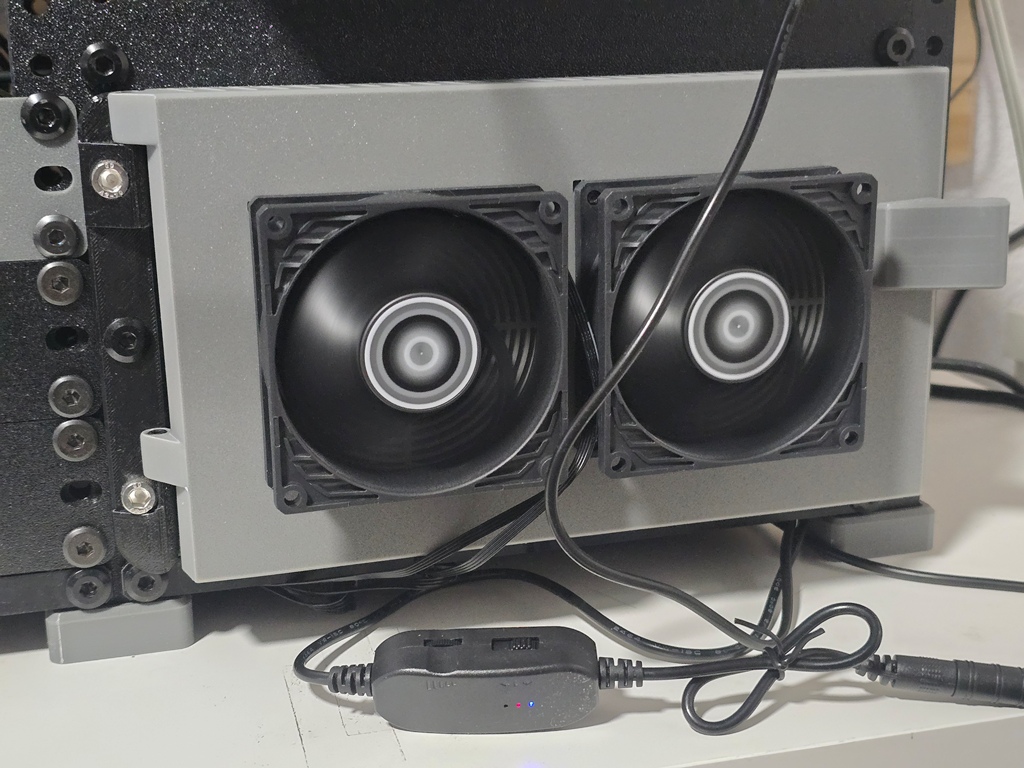
Finally on the bottom where it would be heavy with disks is the JBOD, that requires a section all to itself, I will go into a post in depth later.
Quick look at the front
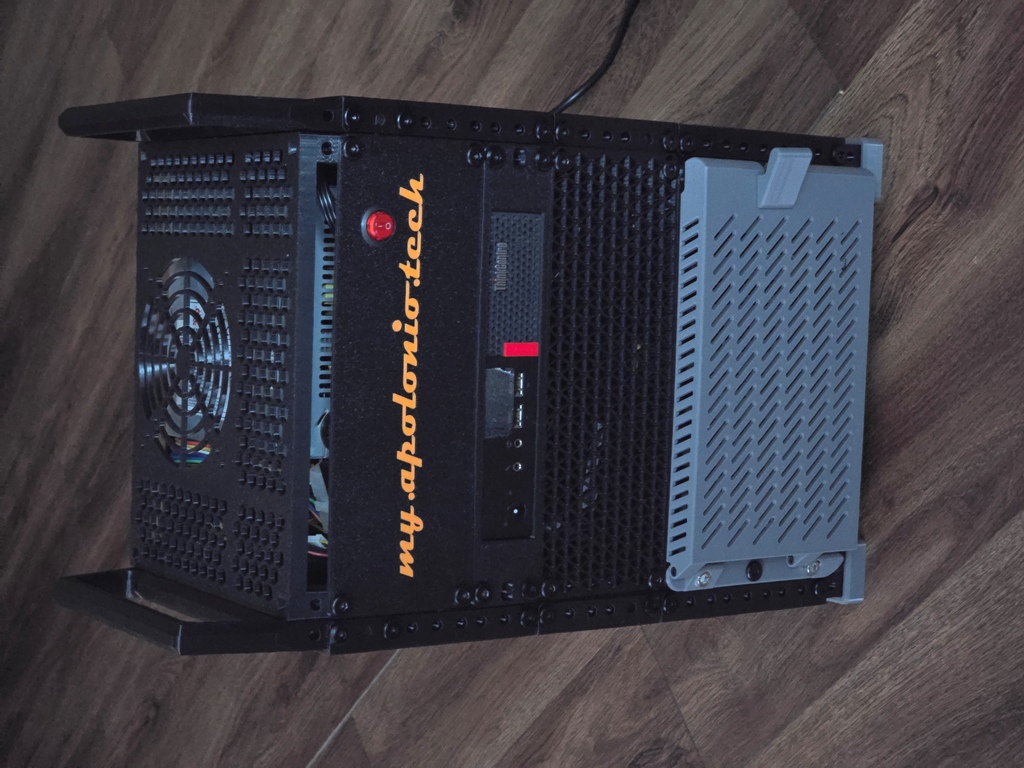
Note the power supply in the picture was replaced by a newer more reliable one. But the front panel is still the same customized one I printed with a hole for the ATX power supply switch. This is a custom panel so there is no STL link I can provide but it is based off of https://www.printables.com/model/1381478-10-rack-blank-and-vented-panels-1-4u
They are 7.99 for a two pack https://www.amazon.com/dp/B098B1WHBL
Below the Head unit is a simple 2U vented blank panel using the same link for the custom panel .
Most of it is printed in PETG, the feet are TPU though and all the front door of the JBOD is PLA.
JBOD
DAS (Direct Access Storage) or JBOD (Just a bunch of disks), this is where all the disks reside. It is 3D printed and is based off of this
https://www.printables.com/model/1372686-3u-hard-drive-bay-for-8x-35in-hdds-for-10-mini-rack
I will do a future post of my experiences, and I had modifications myself, but the author RagingRoosevelt did a great job.
What I can provide is a BOM
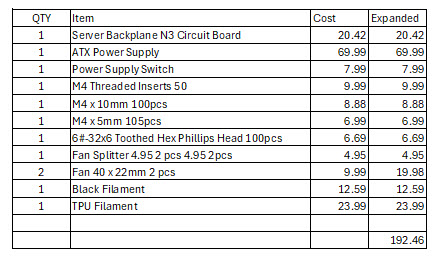
And links to those items, prices change, and note the biggest cost is the ATX power supply which you may be able to find in a PC you are bout to toss.
- https://www.aliexpress.us/item/3256808504084500.html
- https://www.amazon.com/dp/B0CZWCZ138
- https://www.amazon.com/dp/B09XTYKHV5
- https://www.amazon.com/dp/B09MTTC7S9
- https://www.amazon.com/dp/B0CTH3Z2F5
- https://www.amazon.com/dp/B0CZP6R4DL
- https://www.amazon.com/dp/B0BDQT4RR7
- https://www.amazon.com/dp/B01EF9OI0O
- https://www.amazon.com/dp/B07VXT95GN
- https://www.amazon.com/dp/B0DJS3PJVX?th=1
- https://www.amazon.com/dp/B0BXP2WWYF?th=1
Hard Drives
Hard drive prices are crazy as of April 2026, this is just a test nas to try things, so I have put in used SATA and SAS drives in there. As I post there are currently eight 4TB SAS drives that I grabbed from another system I retired.
Temperature has been ok
$ hddtemp
/dev/sda: HGST H7240AS60SUN4.0T: 35°C
/dev/sdb: HGST H7240AS60SUN4.0T: 34°C
/dev/sdc: HGST H7240AS60SUN4.0T: 35°C
/dev/sdd: HGST H7240AS60SUN4.0T: 36°C
/dev/sde: HGST H7240AS60SUN4.0T: 35°C
/dev/sdf: HGST H7240AS60SUN4.0T: 36°C
/dev/sdg: HGST H7240AS60SUN4.0T: 36°C
/dev/sdh: HGST H7240AS60SUN4.0T: 35°C
It is running in RAIDZ2 on Rocky Linux 9.7. I have a VM on there to check things out.
Conclusion
You made it to the end, notice how I am running out of steam. Anyway, just wanted to post what I have for my JBOD because people asked.